Search This Blog

Sunday, October 30, 2011

Jack O' Lantern Amigurumi Tutorial #3!


Trick or treat!

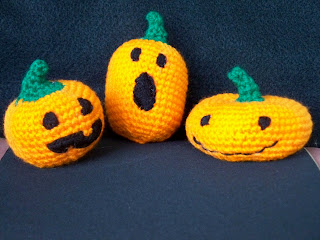
Here it is, the third and final pumpkin in our gourdly trio.  This little fellow’s wide smile may not be very spooky, but it sure is cute!  Enjoy!


Jack O' Lantern #3 – Flat and Wide

Materials:
I used Red Heart SuperSaver yarn for all three pumpkins.  None of them takes a lot of yarn, but the black in particular is a very small amount.

Color A- Paddy Green
Color B- Pumpkin
Color C- Black or black embroidery thread.
Crochet Hook: Size E/4-3.50MM
Split-ring stitch marker (if you don't have any of these, I used to use bobby pins)
Yarn needle
A small amount of polyfiber fill (exactly how much depends on how squishy you want your pumpkin to be).

Gauge: Doesn't really matter.  I tend to pull my stitches pretty tightly when I make amis, so if you crochet loosely you may want to go down a hook size.

Stitch explanation: sc2tog (sc 2 sts together) - Insert hook into st and draw up a loop, insert hook into next st and draw up a loop, yo and draw through all 3 loops on hook - 1 st decreased.

Abbreviations:
beg=begin(ning)
rnd(s)=round(s)
rep=repeat(s) (ing)
ch(s)=chain(s)
sc= single crochet
st(s)= stitch(es)
yo=yarn over

On to the pattern!  The piece is worked in continuous rounds.  Do not join or turn.

With A, ch 2
Rnd 1: 3 sc in 2nd chain from hook
Place marker in first stitch of round.  Move marker up as each round is completed.
Rnd 2: sc in each st around
Rnd 3: 2 sc in each st around - 6 sts
Rnd 4: sc in each st around
Rnd 5: 2 sc in each of next 3 sts, sc in each of last 3 sts - 9 sts
Rnd 6: *2 sc in next st, sc in next st, rep from * 3 times, sc in each of last 3 sts - 12 sts
Rnd 7: 2 sc in each st around - 24 sts
Rnd 8: With Color B *sc in next 3 sts, 2 sc in next st, rep from * around - 30 sts
Rnd 9: *sc in next 4 st, 2 sc in next st, repeat from * around - 36 sts
Rnd 10: *sc in next 5 sts, 2 sc in next st, rep from * around - 42 sts
Rnd 11: *sc in next 6 sts, 2 sc in next st, rep from * around – 48 sts
Rnd 12: *sc in next 7 sts, 2 sc in next st, rep from * around – 54 sts
Rnd 13-15: sc in each st around
Rnd 16: *sc2tog, sc in next 7 sts, rep from * around – 48 sts
Rnd 17-18: sc in each st around
Rnd 19: *sc2tog, sc in next 6 sts, rep from * around – 42 sts
Rnd 20: *sc2tog, sc in next 5 sts, rep from * around – 36 sts
Rnd 21: *sc2tog, sc in next 4 sts, rep form * around – 30 sts
Begin to stuff.  Continue to add stuffing as you go along.
Rnd 22: *sc2tog, sc in next 3 sts, rep from * around – 24 sts
Rnd 23: *sc2tog, sc in next 2 sts, rep from * around – 18 sts
Rnd 24: *sc2tog, sc in next st, rep from * around – 12 sts
Rnd 25: *sc2tog, rep from * around – 6 sts
Fasten off, leaving a long tail for sewing.  Finish stuffing.  Weave tail through the sts of the last rnd and pull tight to close opening.  Knot end.

Finishing
Pass the needle through the pumpkin from bottom to top and top to bottom all the way around the base of the stem and pull slightly to shape.  Fasten off and weave in ends.  Use Color C or black embroidery thread to embroider face.
NOTE: You may find that embroidering the face is easier to do before you stuff the pumpkin and close it up.  If this is the case, I would suggest you pause and embroider each element of the face as you finish the rows you want them to cover.  Then you can stuff it after you’ve finished.

  And there you are!  Enjoy your not-so-spooky buddies.  Happy Halloween!

Monday, October 24, 2011

Jack O' Lantern Amigurumi Tutorial #2!

BOO!

Well, I promised you the second jack o’ lantern, my ghouly friends, and here it is.   If you missed the first one, be sure to check our previous posts for the debut of these little guys.  They love to have friends!


Jack O' Lantern #2 – Tall and Skinny


Materials:
I used Red Heart SuperSaver yarn for all three pumpkins.  None of them takes a lot of yarn, but the black in particular is a very small amount.

Color A- Paddy Green
Color B- Pumpkin
Color C- Black or black embroidery thread.
Crochet Hook: Size E/4-3.50MM
Split-ring stitch marker (if you don't have any of these, I used to use bobby pins)
Yarn needle
A small amount of polyfiber fill (exactly how much depends on how squishy you want your pumpkin to be).

Gauge: Doesn't really matter.  I tend to pull my stitches pretty tightly when I make amis, so if you crochet loosely you may want to go down a hook size.

Stitch explanation: sc2tog (sc 2 sts together) - Insert hook into st and draw up a loop, insert hook into next st and draw up a loop, yo and draw through all 3 loops on hook - 1 st decreased.

Abbreviations:
beg=begin(ning)
rnd(s)=round(s)
rep=repeat(s) (ing)
ch(s)=chain(s)
sc= single crochet
st(s)= stitch(es)
yo=yarn over

On to the pattern!  The piece is worked in continuous rounds.  Do not join or turn.

With A, ch 2
Rnd 1: 3 sc in 2nd chain from hook
Place marker in first stitch of round.  Move marker up as each round is completed.
Rnd 2: sc in each st around
Rnd 3: 2 sc in each st around - 6 sts
Rnd 4: sc in each st around
Rnd 5: 2 sc in each of next 3 sts, sc in each of last 3 sts - 9 sts
Rnd 6: *2 sc in next st, sc in next st, rep from * 3 times, sc in each of last 3 sts - 12 sts
Rnd 7: With Color B, 2 sc in each st around - 24 sts
Rnd 8: *sc in next 3 sts, 2 sc in next st, rep from * around - 30 sts
Rnd 9: *sc in next 4 st, 2 sc in next st, repeat from * around - 36 sts
Rnd 10: *sc in next 5 sts, 2 sc in next st, rep from * around - 42 sts
Rnd 11: sc in each st around
Rnd 12: *sc2tog, sc in next 5 st, rep from * around – 36 sts
Rnd 13-20: sc in each st around
Begin to stuff.  Add more stuffing as you go along.
Rnd 21: *sc2tog, sc in next 4 sts, rep from * around – 30 sts
Rnd 22: *sc2tog, sc in next 3 sts, rep from * around – 24 sts
Rnd 23: *sc2tog, sc in next 2 sts, rep from * around – 18 sts
Rnd 24: *sc2tog, sc in next st, rep from * around – 12 sts
Rnd 25: *sc2tog, rep from * around – 6 sts
Fasten off.  Leave long tail for sewing.  Finish stuffing.  Weave tail through stitches of last rnd and tighten to close opening.  Knot end.

Finishing
Weave in ends.  Use Color C or black embroidery thread to embroider face.
NOTE: You may find that embroidering the face is easier to do before you stuff the pumpkin and close it up.  If this is the case, I would suggest you pause and embroider each element of the face as you finish the rows you want them to cover.  Then you can stuff it after you’ve finished.


Jack O’ Lantern #2 complete!  Up next: #3, wider and flatter!

Happy Halloween!

Thursday, October 20, 2011

Halloween Jack o' Lantern Amigurumi Tutorial #1!

Greetings, ClockQuirkians!

With Halloween creeping around the corner, I thought a fun amigurumi pattern was in order.  I have three little jack o' lanterns to share over the next couple of weeks, but we're going to start with the littlest one:


Jack O' Lantern #1 - Small and Round


Materials:
I used Red Heart SuperSaver yarn for all three pumpkins.  None of them takes a lot of yarn, but the black in particular is a very small amount.

Color A- Paddy Green
Color B- Pumpkin
Color C- Black or black embroidery thread.
Crochet Hook: Size E/4-3.50MM
Split-ring stitch marker (if you don't have any of these, I used to use bobby pins)
Yarn needle
A small amount of polyfiber fill (exactly how much depends on how squishy you want your pumpkin to be).

Gauge: Doesn't really matter.  I tend to pull my stitches pretty tightly when I make amis, so if you crochet loosely you may want to go down a hook size.

Stitch explanation: sc2tog (sc 2 sts together) - Insert hook into st and draw up a loop, insert hook into next st and draw up a loop, yo and draw through all 3 loops on hook - 1 st decreased.

Abbreviations:
beg=begin(ning)
rnd(s)=round(s)
rep=repeat(s) (ing)
ch(s)=chain(s)
sc= single crochet
st(s)= stitch(es)
yo=yarn over

On to the pattern!  The piece is worked in continuous rounds.  Do not join or turn.

With A, ch 2
Rnd 1: 3 sc in 2nd chain from hook
Place marker in first stitch of round.  Move marker up as each round is completed.
Rnd 2: sc in each st around
Rnd 3: 2 sc in each st around - 6 sts
Rnd 4: sc in each st around
Rnd 5: 2 sc in each of next 3 sts, sc in each of last 3 sts - 9 sts
Rnd 6: *2 sc in next st, sc in next st, rep from * 3 times, sc in each of last 3 sts - 12 sts
Rnd 7: With Color B, 2 sc in each st around - 24 sts
Rnd 8: *sc in next 3 sts, 2 sc in next st, rep from * around - 30 sts
Rnd 9: *sc in next 4 st, 2 sc in next st, repeat from * around - 36 sts
Rnd 10: *sc in next 5 sts, 2 sc in next st, rep from * around - 42 sts
Rnd 11: *sc in next 6 sts, 2 sc in next st, rep from * around - 48 sts
Rnd 12-14: sc in each st around
Rnd 15: *sc2tog, sc in next 6 st, rep from * around - 42 sts
Rnd 16-17: sc in each st around
Begin stuffing before the opening gets too small.
Rnd 18: *sc2tog, sc in next 5 st, rep from * around - 36 sts
Rnd 19: *sc2tog, sc in next 4 sts, rep from * around - 30 sts
Rnd 20: *sc2tog, sc in next 3 sts, rep from * around - 24 sts
Rnd 21: *sc2tog, sc in next 2 sts, rep from * around - 18 sts
Rnd 22: *sc2tog, sc in next st, rep from * around - 12 sts
Rnd 23: *sc2tog 3 times around - 6 sts
Fasten off.  Leave long tail for sewing.  Finish stuffing.  Weave tail through stitches of last rnd and tighten to close opening.  Knot end.

Finishing
Weave in ends.  Use Color C or black embroidery thread to embroider face.
NOTE: You may find that embroidering the face is easier to do before you stuff the pumpkin and close it up.  If this is the case, I would suggest you pause and embroider each element of the face as you finish the rows you want them to cover.  Then you can stuff it after you’ve finished.


Enjoy your little jack o' lantern!  In a couple of days I'll be sharing the pattern for the tall and skinny pumpkin.  Stay tuned and happy Halloween!

Wednesday, October 12, 2011

Confessions of an Arts Festival Newbie


I have so many thoughts on the College Park Arts Festival I don’t even know where to begin. But as they say in the Wizard of Oz, it’s always best to begin at the beginning. We arrived right on the dot of 8:30, which was supposedly check in time. However, lots of people were already there setting up. Lesson number one – check in time doesn’t always mean check in time. We could have come earlier and been less rushed.

We were given our space number (supposedly) and went looking for our space. We were sent the wrong way to find our spot, and told the wrong number. That was especially disconcerting because someone was setting up their stuff in the spot we were told was ours. Minor panic! The volunteers got it straightened out quickly though, so we found our actual spot. We had a good location. We were right across from the entrance to the parking lot. We immediately set to work unloading the truck. Tables, crates, an Ć©tagĆØre, and Calliope, our trusty mannequin.

We had an inexpensive canopy tent (more on that later) with a zillion poles. Luckily, the local Boy Scout troop was there to help out and two of the guys helped us get the tent up quickly.  Our space sat on a slight slope. We got busy setting out our wares. I had an emotional moment in the middle of it all. This was my dream coming true. Very exciting! Ellie and I looked at each other as we have several times in the last few days and said, “We have a shop!” 


Grady, my grandson, came along with us. I don’t know what we would have done without him. He helped with loading and unloading, setting up, and he was the chief dispenser of business cards. He had a great time and was a huge help.


Setting up was lots of fun. We had both worried that we hadn’t had time to make enough things for our shop to look full, but as we began to set them out it was looking pretty good. We had little placard signs to sit on the tables and shelves to show prices, etc. Ah, all set. Now we just waited for customers.


Ellie and I were both anxious to see what people thought about our things, things we had poured our heart and soul into. It’s always a little nerve-wracking when you think you’re being judged. People began to come in and made very nice comments. Whew, that felt good. Then we made a sale. Yippee!!  So far so good.


Then it happened. All I can say is choose your tent carefully.  We could tell that our tent was not the standard tent at the festival. People were putting up their pop up tents, which looked much sturdier than ours, and way easier to put up. Do these people know something we don’t?  Hmmmm . . . It was a breezy day. The slight slope and the breeze were not working in our favor. In the early afternoon a puff of wind came along and blew our tent almost completely over! We scurried around like crazy people trying to think of a solution. Luckily, my sister, Kathy, was there to help hold things up while we looked for a way to deal with the problem. Thankfully, we remembered the bungee cords, ropes, and stakes in the truck. We were next to the curb, which had an area of grass, so we put a stake in the ground and tied a rope to pull the tent back in the direction it was supposed to go. We used a bungee cord to lash the tent pole to the table leg to give it more stability (something which I had suggested earlier to my family, and my sister had a good laugh about – who’s laughing now?) and pushed the other table up against one of the front poles so it was kind of propped up. Catastrophe averted! Note to self: Get a better canopy tent before the next event.

We learned a lot from this experience. We learned to get a better tent (big eye roll here). We learned that even a small breeze will blow all your placards down, and we learned better ways to display our wares, and which things needed a price adjustment.

People came and went, looked at our goods, some bought, some didn’t. The day went by quickly. I thought I would enjoy doing a festival but had no idea just how much fun it would really be. It was a blast, even in view of our tent fiasco, and I can’t wait for the next one.

We had a few newbie mistakes, but not too terribly many. All in all, it was a good day.

~Bonnie, Diva of the Needle

Monday, October 3, 2011

Mini-Post: Happy Halloween to you too, www.parentmap.com!

ClockQuirks' Harry Potter robes were featured in a recent article from parentmap.com about Halloween costumes that you can buy on Etsy.  We are immensely proud of our custom costumes and so very pleased to be recognized.  Have you seen our made-to-order-just-for-you Harry Potter robes?  You simply must!  (click here!)  We offer them in any size and any house.  Perfect for Halloween, pretend play time (the charming model for our pics is putting his to use daily, I can assure you), conventions or that trip to a certain theme park...

We also make Quidditch robes, which are not easy to find.  Take a look right here!


Friday, September 2, 2011

Monkey Love


 I started this business to sell my handmade goods. That’s the reason I started it.  I lovingly made sock monkeys.  I stitched their little bodies and carefully stuffed them.  I embroidered their little twinkly eyes.  Not sure embroidery floss can twinkle, but you know what I mean if you craft. I put part of myself in those monkeys.  We excitedly listed them on our shop site and waited.  We waited awhile and with every “favorite” we got, we felt more and more confident that this was going to work. Then the day came that we got the email – our first sale. Woohoo! We really have a business. 

So I’m sitting here packing up Grandpa, wrapping him nicely and putting in a thank you card to the nice lady who bought him, when suddenly I feel a little sad.  I’m going to have to tell him goodbye and send him on his way. He’s one of my children, though granted he’s one of my stuffed sock children. I have to send him out into the world alone. I’m laughing at myself as I write this. I’m taking pictures of him like a kid going off to college.

I hope he likes his new home. Here are some pics as we get him ready to go:


At least he'll be cozy.  I'm sure he'll be very loved!  --Bonnie


Friday, August 19, 2011

Scrabble Tiles, Glaze and the Learning Curve

So, Bonnie (Mom) and I are making Scrabble tile jewelry for the Tweely (i.e., cute) line of ClockQuirks.  We spent much of Saturday painting tiles and had a grand time letting our creativity run uninhibited.  However, the process has not been without its challenges.

I dug into the painting first, as Mom was off stitching away on her latest purse.  My first attempts were not particularly attractive.  I tried using the letters as part of the design, but none of them came out like I pictured them and that wasn't a good thing.  Mom came over to check them out and said, "Which ones do you like?"  I said, "I'm not particularly crazy about any of them".  She sighed with relief and said, "Oh, okay."  Yeah, not so hot.

However, she suggested turning them over and just using the blank side to paint whatever I wanted.  I had an idea and after painting a graduated background that I liked, I painted a design inspired by the chinese characters for "serenity".  I say "inspired" because I'm sure an actual chinese calligrapher would weep at the liberties I took.  Still, for artistic and aesthetic purposes, I was pleased:


Once I got started on something I liked, I found it easier to relax and enjoy myself.  Pretty soon Mom had finished what she was working on and came over to get in on the action.  Her results were promising as well.  She came up with the idea of not only painting tiles, but also covering them with fabric.  We got good results using the fabric from our Contrast Ruffle Tote:

The tile to the far left is finished but the pattern doesn't show up well in the picture.  The other three are still raw (no glaze or bail) but you can see how cool the fabric looks on the tile.


Pretty soon we had a whole gaggle of tiles that we felt good about:


This is what we came up with.  All but the four closest to the front have already been glazed in this picture.


Next we needed to glaze them to protect the paint and give them a nice, glossy finish.  This is where it got tricky.  Neither of us had ever used jewelry glaze before.  After some practice I felt pretty good about it (although getting rid of bubbles proved to be slightly annoying).  I put on 2 layers and left them to dry over night.

Unfortunately, when I woke up the next morning, my beautifully glazed tiles had a problem.  There
was a patch of deep wrinkles in the center of nearly every single one (the photographic evidence of which was inadvertently deleted).  This was probably a result of too thick a layer of glaze, but I may never know for sure.  It would actually be kind of a cool effect if you painted the tile to look good with it underneath, but none of them had been.  After a text message discussion with Mom, we decided we might as well try putting a thin layer of glaze over the wrinkles to see if that would fix it.  Luckily, it did!  That meant it was time to put on the bails.  For those that don't make jewelry, the bail is the loop on top of a pendant that the cord or chain is threaded through.  Happily, there were no complications with the bails and the tiles look great (in my opinion).  Here are a few pics, some before I put the bails on them and some after:


So, what would/do you paint on your scrabble tiles?  Comment with your ideas!  --Ellie

Wednesday, August 10, 2011

Winding the Works


Congratulations!  You found your way to the ClockQuirks blog.

Whatever in the world is ClockQuirks?  Well you may ask.  Sometimes I think even we don’t know.  ClockQuirks is, technically, a business.  We make things and then sell them.  But more than that, it is the outpouring of a desperate need to make something with your own hands, preferably after being made up out of your own head, shaping it and tuning it until you have something beautiful and self-expressive, and then finding that somebody else feels it expresses themselves, too.

We are starting ClockQuirks because we love to see ordinary things turn into something unique and special.  Bonnie once said that you know you’re an artist when you look at something you created and think, “Wow, just a little while ago this was nothing but ‘stuff’”.  I know exactly what she means.  Even before that happens, there’s an exhilarating moment (or several) when you’re still working on it and you think, “This is going to be good”.  And to top it all off, if it really is good, you pick it up the next day and you still think, “Yep, that one’s a keeper” (unfortunately, that doesn’t always happen—occupational hazard).

Sure, we've started a business because we want to make more money.  But we started this business because we’re total creative junkies, “hooked on the feelin’” you get when you turn “stuff” into art.

--Ellie, MaƮtresse de Crochet