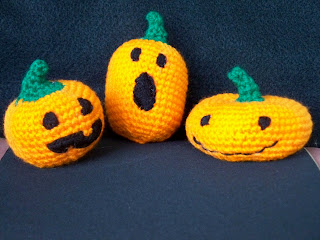
Trick or treat!
Here it is, the third and final pumpkin in our gourdly trio. This little fellow’s wide smile may not be very spooky, but it sure is cute! Enjoy!
Jack O' Lantern #3 – Flat and Wide
Materials:
I used Red Heart SuperSaver yarn for all three pumpkins. None of them takes a lot of yarn, but the black in particular is a very small amount.
Color A- Paddy Green
Color B- Pumpkin
Color C- Black or black embroidery thread.
Crochet Hook: Size E/4-3.50MM
Split-ring stitch marker (if you don't have any of these, I used to use bobby pins)
Yarn needle
A small amount of polyfiber fill (exactly how much depends on how squishy you want your pumpkin to be).
Gauge: Doesn't really matter. I tend to pull my stitches pretty tightly when I make amis, so if you crochet loosely you may want to go down a hook size.
Stitch explanation: sc2tog (sc 2 sts together) - Insert hook into st and draw up a loop, insert hook into next st and draw up a loop, yo and draw through all 3 loops on hook - 1 st decreased.
Abbreviations:
beg=begin(ning)
rnd(s)=round(s)
rep=repeat(s) (ing)
ch(s)=chain(s)
sc= single crochet
st(s)= stitch(es)
yo=yarn over
On to the pattern! The piece is worked in continuous rounds. Do not join or turn.
With A, ch 2
Rnd 1: 3 sc in 2nd chain from hook
Place marker in first stitch of round. Move marker up as each round is completed.
Rnd 2: sc in each st around
Rnd 3: 2 sc in each st around - 6 sts
Rnd 4: sc in each st around
Rnd 5: 2 sc in each of next 3 sts, sc in each of last 3 sts - 9 sts
Rnd 6: *2 sc in next st, sc in next st, rep from * 3 times, sc in each of last 3 sts - 12 sts
Rnd 7: 2 sc in each st around - 24 sts
Rnd 8: With Color B *sc in next 3 sts, 2 sc in next st, rep from * around - 30 sts
Rnd 9: *sc in next 4 st, 2 sc in next st, repeat from * around - 36 sts
Rnd 10: *sc in next 5 sts, 2 sc in next st, rep from * around - 42 sts
Rnd 11: *sc in next 6 sts, 2 sc in next st, rep from * around – 48 sts
Rnd 12: *sc in next 7 sts, 2 sc in next st, rep from * around – 54 sts
Rnd 13-15: sc in each st around
Rnd 16: *sc2tog, sc in next 7 sts, rep from * around – 48 sts
Rnd 17-18: sc in each st around
Rnd 19: *sc2tog, sc in next 6 sts, rep from * around – 42 sts
Rnd 20: *sc2tog, sc in next 5 sts, rep from * around – 36 sts
Rnd 21: *sc2tog, sc in next 4 sts, rep form * around – 30 sts
Begin to stuff. Continue to add stuffing as you go along.
Rnd 22: *sc2tog, sc in next 3 sts, rep from * around – 24 sts
Rnd 23: *sc2tog, sc in next 2 sts, rep from * around – 18 sts
Rnd 24: *sc2tog, sc in next st, rep from * around – 12 sts
Rnd 25: *sc2tog, rep from * around – 6 sts
Fasten off, leaving a long tail for sewing. Finish stuffing. Weave tail through the sts of the last rnd and pull tight to close opening. Knot end.
Finishing
Pass the needle through the pumpkin from bottom to top and top to bottom all the way around the base of the stem and pull slightly to shape. Fasten off and weave in ends. Use Color C or black embroidery thread to embroider face.
NOTE: You may find that embroidering the face is easier to do before you stuff the pumpkin and close it up. If this is the case, I would suggest you pause and embroider each element of the face as you finish the rows you want them to cover. Then you can stuff it after you’ve finished.
And there you are! Enjoy your not-so-spooky buddies. Happy Halloween!


