Greetings!
Well, the ClockQuirks blog has been off the grid for a while, but we're back! A lot has been happening and we want to share some of the exciting things going on behind the scenes that will have a big impact on the look and content of our shop in future. Here's what we're up to:
New (sort of) Faces
Jason, son to Bonnie and brother to Ellie, has come aboard in a more fully integrated capacity. While Jason has always helped out with the web design and site upkeep, he's getting more involved than ever to get things running smoothly as well as bringing a lot of new creative ideas to the table. Which brings us to...
New Website
We are working on launching a brand new website at our newly acquired cyber premises, clockquirks.biz. Our virtual shop window will have a fresh look, friendlier navigation and an onsite shopping feature that will allow you to purchase straight from us, no Etsy needed. We are still maintaining an Etsy shop, however, so with all of this available "shelf" space, we're going to need...
New Products
The creative ideas are flying around here. Jason and Grady are working on crafting some new geekery (can you say originally designed lightsabers and wands, anyone?) while Bonnie is adding custom costumes to her repertoire (like a commissioned recreation of Princess Anna's traveling dress from Frozen; a photo shoot is forthcoming!). Ellie is designing some new steampunky fingerless gloves and re-imagining some popular designs, like our Doctor Who-inspired pearl choker. Bohemian brides can expect to find some lovely things to make their special day fit their personal style as well. But these items aren't limited to our internet shops. We also want to have...
New Festival and Convention Appearances
We would really like to crank up the number of "personal appearances" we make this year, so we're looking at festivals and craft fairs throughout the spring and summer as well as the fall. We have this crazy dream of having a booth at DragonCon this year, which would be incredible. Kind of like the mother ship calling us home!
So that's what's new with us, ClockQuirkians. If you have any suggestions for craft fairs in the metro Atlanta area or ideas for costumes or other creations that you would like to see us realize, please comment! We LOVE a challenge.

Saturday, March 1, 2014


Friday, February 22, 2013
Daisy Head Mayzey
Dr. Seuss' birthday is March 2nd and last year my kids and I went to a party for him. We had lots of fun, not the least of which involved making our own costumes. I decided to go as Daisy Head Mayzey, so I made a head piece to give me that flower-sprouting-out-of-my-hair look. Tell yourself how lucky you are, because I'm going to tell you how I did it! This is a seriously easy project that I did in about 20 minutes the morning of the party. If I can do it, so can you!
Materials
2 pieces of white copy paper
1 piece of yellow construction paper
3 green pipe cleaners
Scotch tape
Pencil
Ruler
Scissors
Bowl or small plate to trace the circumference of your daisy
Drinking Glass to trace the circumference of your flower's center
Bobby pins and a hair elastic to attach the flower in your hair.
Optional: Fabric headband to pin the flower to if your hair is too short to pull back.
Instructions
1. With both pieces of white paper stacked together, trace around the bowl or small plate and cut the circle out of both thicknesses of paper. Tape the 2 circles together in the center.
2. On the yellow paper, trace around the glass. Cut out the circle.
3. Center the yellow circle on the white circle and trace lightly around it. Set the yellow circle aside.
4. Use the ruler to draw lines criss-crossing through the center of the white circle. These will be your petals.
5. Take the 2 white circles still stacked together and cut along the lines, stopping at the edge of the inner circle. You may choose to round out the ends of the petals.
6. Tape the yellow circle to the center.
7. Holding the 3 green pipe cleaners together, begin twisting the pipe cleaners. To make leaves on the stem, make a loop in one of the pipe cleaners and twist it once or twice. Continue to twist the 3 pipe cleaners together. After a few more twists, make a leaf in another pipe cleaner. Twist them together again and then make a leaf in the 3rd pipe cleaner. Once you've twisted them down to the end, make a loop at each end of the stem and fold it up to a 90 degree angle.
8. Taping across one loop, attach the stem to the back of the flower.
Your flower is constructed!! Let's get it ready to wear.
1. Coil the stem around a lipstick tube or 2 fingers to make it into a spring. This will make the flower more stable and allow it to bounce. Originally I used a pencil, but I found that a slightly fatter spring worked better.
2. Ruffle the petals of your flower by gently bending each of the top layer of petals, one up, the next one down, etc. You don't need to do a hard crease, just a little pull. For the bottom layer, I bent every other one down and left the rest alone.
3. Bobby pin the flower into your hair. I found it stayed put very well when I pulled back the top of my hair with the hair elastic, slid the loop in the end of the stem up under the hair in the center, and then bobby pinned across the loop. If you have short hair, you could also wear a fabric headband (something with strong elastic, not too stretchy) and bobby pin the flower to that. You could also hot glue the flower to a plastic headband.
You're ready for your Dr. Seuss extravaganza!
~Ellie, Maîtresse des Fleurs de Papier
Materials
2 pieces of white copy paper
1 piece of yellow construction paper
3 green pipe cleaners
Scotch tape
Pencil
Ruler
Scissors
Bowl or small plate to trace the circumference of your daisy
Drinking Glass to trace the circumference of your flower's center
Bobby pins and a hair elastic to attach the flower in your hair.
Optional: Fabric headband to pin the flower to if your hair is too short to pull back.
Instructions
1. With both pieces of white paper stacked together, trace around the bowl or small plate and cut the circle out of both thicknesses of paper. Tape the 2 circles together in the center.
2. On the yellow paper, trace around the glass. Cut out the circle.
3. Center the yellow circle on the white circle and trace lightly around it. Set the yellow circle aside.
4. Use the ruler to draw lines criss-crossing through the center of the white circle. These will be your petals.
5. Take the 2 white circles still stacked together and cut along the lines, stopping at the edge of the inner circle. You may choose to round out the ends of the petals.
6. Tape the yellow circle to the center.
7. Holding the 3 green pipe cleaners together, begin twisting the pipe cleaners. To make leaves on the stem, make a loop in one of the pipe cleaners and twist it once or twice. Continue to twist the 3 pipe cleaners together. After a few more twists, make a leaf in another pipe cleaner. Twist them together again and then make a leaf in the 3rd pipe cleaner. Once you've twisted them down to the end, make a loop at each end of the stem and fold it up to a 90 degree angle.
8. Taping across one loop, attach the stem to the back of the flower.
Your flower is constructed!! Let's get it ready to wear.
1. Coil the stem around a lipstick tube or 2 fingers to make it into a spring. This will make the flower more stable and allow it to bounce. Originally I used a pencil, but I found that a slightly fatter spring worked better.
2. Ruffle the petals of your flower by gently bending each of the top layer of petals, one up, the next one down, etc. You don't need to do a hard crease, just a little pull. For the bottom layer, I bent every other one down and left the rest alone.
3. Bobby pin the flower into your hair. I found it stayed put very well when I pulled back the top of my hair with the hair elastic, slid the loop in the end of the stem up under the hair in the center, and then bobby pinned across the loop. If you have short hair, you could also wear a fabric headband (something with strong elastic, not too stretchy) and bobby pin the flower to that. You could also hot glue the flower to a plastic headband.
You're ready for your Dr. Seuss extravaganza!
~Ellie, Maîtresse des Fleurs de Papier
Monday, January 28, 2013
Valentine's Day Rescue!
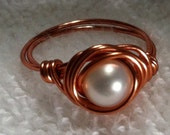
The day of love is nearly upon us. Are you ready? Exordium by ClockQuirks has some exquisite jewelry, all handmade, each item uniquely it's own. Our Exordium line is all about elegance. And with a range of prices for every budget, you can give your lady love a gift that is as unique as she is and still have money left over to take her to dinner.
Each of the below is just one example of dozens of beautiful pieces. You can also search in our shop by ring size, type of jewelry, or keywords like "crystal", "pearl", or "silver".
Each of the below is just one example of dozens of beautiful pieces. You can also search in our shop by ring size, type of jewelry, or keywords like "crystal", "pearl", or "silver".




Tuesday, January 22, 2013
Bright as a Button Ring
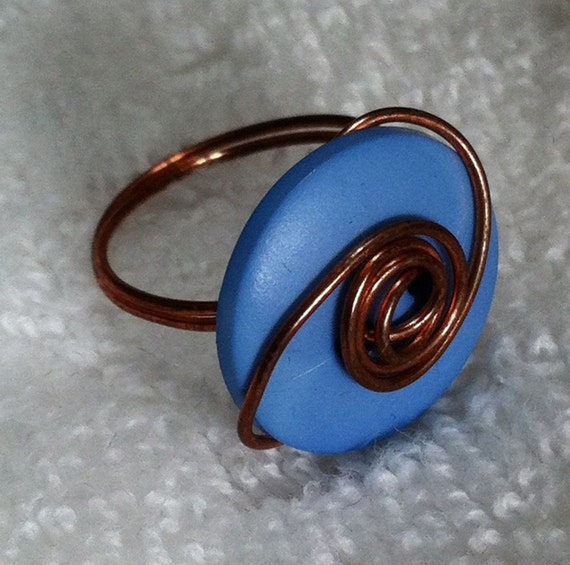
So, I've been doing wire wrap jewelry for a little while now and while wire and crystal are still my favorite kind of jewelry to make (so far), I recently tried using buttons in my rings and they were adorable! I proceeded to make a couple dozen more, trying out different color combinations, sizes and wire wrapping techniques. For your edification, ClockQuirkians, here are my favorites:

 This is the simplest design, but I love the colors. I tried a lot of different pairings, all of which I like, but these two got extra big smiles.
 I love spirals in wire work, so I had to come up with a way to use it in my button rings. Love how it turned out!
 More spirals, but a different kind this time. Coils are such an aesthetic design detail and so much fun to make!
We have a large selection of button rings available in our Tweely shop.


We have a large selection of button rings available in our Tweely shop.
Tuesday, January 15, 2013
Sock Monkey in the Middle
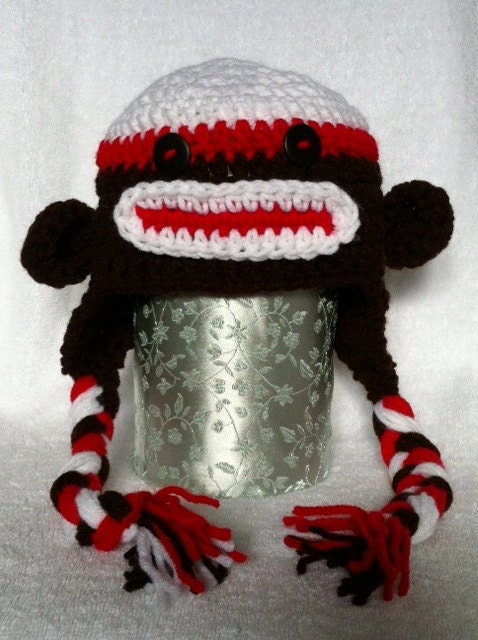
Bonnie (Mom to me) has proven that my status as Maitresse de Crochet is an inherited title! She has created the cutest animal hats, and she did it with her crochet hook! They were originally made as baby gifts for several friends who have brand new little ones, but they were just too cute to keep to herself. Now you can find them in the Tweely shop here. Too cute!!

 It all started with a sock monkey. You'll notice in our shop that sock monkeys are kind of a thing for us. When Bonnie needed a baby gift, she decided to try making a hat and what better inspiration than our buddy the sock monkey?
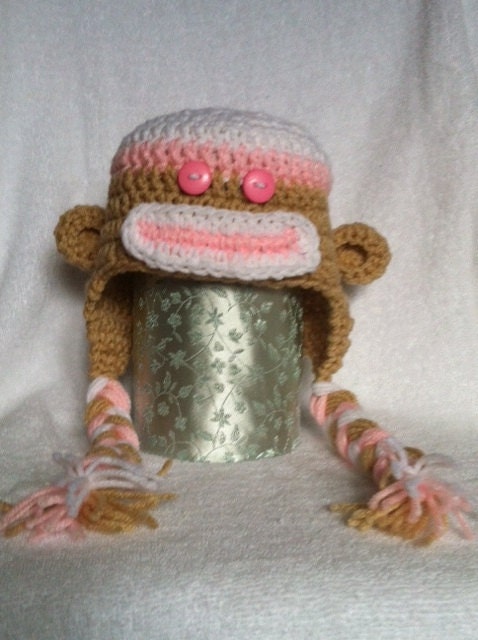
We have a special soft spot for pink sock monkeys because we give a portion of the proceeds to breast cancer research. They were the inspiration for this pink monkey hat made for a little baby girl.

The monkeys came out so great that a bear seemed the obvious next step. This adorable teddy hat is as cozy as it is cute!

This was a total brain wave on Mom's part. I love his ears!! And zebra stripes are soooooo fashionable. :-)
 It all started with a sock monkey. You'll notice in our shop that sock monkeys are kind of a thing for us. When Bonnie needed a baby gift, she decided to try making a hat and what better inspiration than our buddy the sock monkey?
We have a special soft spot for pink sock monkeys because we give a portion of the proceeds to breast cancer research. They were the inspiration for this pink monkey hat made for a little baby girl.
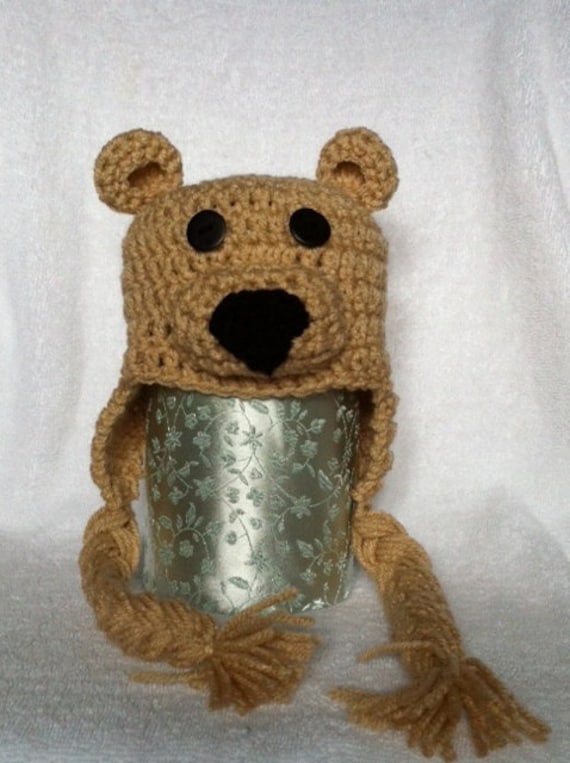
The monkeys came out so great that a bear seemed the obvious next step. This adorable teddy hat is as cozy as it is cute!

This was a total brain wave on Mom's part. I love his ears!! And zebra stripes are soooooo fashionable. :-)
Monday, December 10, 2012
Monday's Muse: Rain, rain, don't go yet!


Hopefully I'll be posting Wednesday in the Works entries of my new work before long!
Tuesday, October 30, 2012
Jack O' Lantern Jubilee - Etsy Treasury Tuesday
'Toothy Grins' by Tweely
A party of pumpkins cutting up on Halloween night!
 Silly Jack-O-Lantern Go...
$20.00
|  Origami Jack-o-lantern ...
$12.00
|  Halloween Pumpkin Ring,...
$10.00
|
 Jack-O-Lantern Necklace
$12.00
|  Jacko Locket
$35.00
|  HALLOWEEN BUBBLE BRACEL...
$30.00
|
 Custom Made-to-Order Sy...
$45.00
|  Pumpkin Patch Ring. Hal...
$12.00
|  Halloween pumpkin cockt...
$45.00
|
 Red or Off White Flamel...
$22.00
|  Newborn Jack-o-lantern ...
$20.00
|  Halloween Cat and Jack-...
$50.00
|
Treasury tool supported by the dog house
Monday, October 29, 2012
Monday's Muse- Alice Through the Looking Glass
I have loved "Alice in Wonderland" ever since I was a child and have always found it inspiring. When I got older, I read the second book, "Through the Looking Glass", and discovered a whole new world of inspiration. Many artists have adapted it into their own mediums, and as I've learned and developed as a fiber artist it only seemed natural that I would translate this well-loved world into my medium as well. For Wednesday in the Works I will have some pictures of the project I have in process, but for today I just want to show you the book illustrations that have inspired me most.
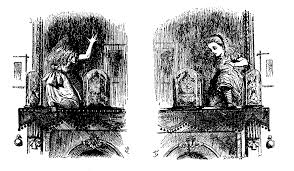 I love this picture of Alice traveling out of our world and into Looking Glass Land, out of the normal and into the fantastic. These illustrations have such wonderful detail, like the fact that the Looking Glass mantel clock has a face.

While "Alice in Wonderland" features a playing card theme, "Through the Looking Glass" sets it's story in a giant chess game. I'm not a very good chess player but there is something tantalizing about a chess world, especially when the pieces have such distinct personalities.
 Ah, the Red Queen! Quite an enigmatic figure. You're never really sure where she stands or what she's up to.
 Alice hopes to cross the board and become a queen, but it might not be all it's cracked up to be...
If you've never read this delightful story, I highly recommend it. I'm crafting some queenly accessories inspired by this book and I hope to come up with more drawn from other parts of the story. What could you do with a Jabberwock, I wonder...

While "Alice in Wonderland" features a playing card theme, "Through the Looking Glass" sets it's story in a giant chess game. I'm not a very good chess player but there is something tantalizing about a chess world, especially when the pieces have such distinct personalities.

If you've never read this delightful story, I highly recommend it. I'm crafting some queenly accessories inspired by this book and I hope to come up with more drawn from other parts of the story. What could you do with a Jabberwock, I wonder...
Tuesday, October 23, 2012
Treasury Tuesday - Button It Up!
'Cute as a Button!' by Tweely
Button, button, who's got the button? Our Etsy artists, that's who!
 Antique Button Jewelry ... $129.00 |  Button Brooch - Set of ... $13.00 |  Button UP $25.00 |
 Button Necklace - Vint... $33.00 |  Gorgeous Green Button N... $5.00 |  Ring Vintage Button Jew... $27.00 |
 BUTTONS JEWELRY button... $38.00 |  Brown Sugar Button Neck... $18.00 |  BUTTON Necklace - Vinta... $35.00 |
 Big Girl Vintage Cuff $80.00 |  Button Bracelet $20.00 |  Brown, Orange and green... $23.00 |
Treasury tool supported by the dog house
Wednesday, October 17, 2012
How Doth the Little Crocodile Stitch
It's time for another Wednesday in the Works! I'm working on some really cool stuff and I want to share. Hopefully it will be inspiring to you!
My new favorite stitch to crochet is the crocodile stitch. I love the intricacy of it (I never get bored working this stitch!) and the versatility. So far I've used it as dragon scales, mermaid scales and even feathers! It has inspired multiple projects. Three are finished and two are still in the works, making it the perfect topic for today's blog.
Meg's "Blood of the Dragon" Cuff
My first real project with this stitch was actually a gift for my sister (in-law). We have both been reading J.R.R. Martin's Song of Ice and Fire series (aka, "Game of Thrones") and so, for her birthday, I crafted a dragony cuff fit for one who is "the blood of the dragon", as one prominent character is known to say. Unfortunately, I hadn't learned my lesson yet about taking pictures of my work, even when I wasn't going to sell it, so there's no photo evidence. I should get her to send me a pic!
Dark Wings, Dark Words

With visions of Westeros still dancing in my head, I decided to develop another idea I'd had. To me, the scales could also be feathers. I crocheted and unraveled and crocheted again to create this gauntlet, using the scales as raven feathers. In the GoT books, they use specially trained ravens to carry messages. As urgent messages tend to be bad news, this gave rise to the saying "Dark wings, dark words". It was the perfect title for my creation. This one has actually made it to our Exordium shop on Etsy here.
Swedish Short-Snout Necklace

Mermaid Cuff


Dragon Skin Shawl
I can't claim credit for the idea of using the crocodile stitch to make a shawl, or even of calling it dragon skin, but I love it. I tried it out in a soft bulky weight yarn I had in my stash and I think we have a winner. I had intended to do it in a different color (I just finished a shawl and hat in a yarn of mottled greens and browns) but now that I see the purple, I may keep it. Dragons are fantasy creatures; who says they have to be green?
Have you worked anything in crocodile stitch? What ideas does it give you about possible uses? Leave a picture or comment below!
Subscribe to:
Posts (Atom)